If you want to embed your Twitter feed in your website or blog, you need a Twitter widget.
A Twitter widget automatically pulls content from your Twitter feed so that you can keep your website fresh with new content. This is the most popular use case for a Twitter widget, and our step-by-step guide will show you exactly how to add a stream of tweets from your account, a specific hashtag, or from mentions of your account.
How to add a Twitter widget to your site
A Twitter widget is no-code technology that allows anyone to add their Twitter content to their website with no coding required.
Curator's WordPress plugin works for Twitter, Facebook, YouTube, Instagram, and TikTok.
However, if you don't have a WordPress website that's fine too. Instead of using the plugin, you can simply add a custom HTML widget anywhere on your website and copy and paste the code.
Here's an example of a Twitter widget showing recent tweets on the City of Riverside's website.

Here are 7 easy steps for adding and maintaining a Twitter widget:
Step 1. Select an easy-to-use widget
The first step is to choose a social media widget, also known as a social media aggregator, which will pull in your social posts according to the rules that you set.
The software should:
- Offer free or affordable plans that fit your needs
- Work for the social media platforms you want to aggregate (especially Twitter!)
- Allow you to add content from different platforms if you want
- Provide templates and easy styling options to help you match the widget to your website's design
Once you've selected the right app, everything else should be super easy.
Step 2. Create a new feed and set the moderation style
The next step is to create your first feed in your account.
All you have to do is hit "Create New Feed."
Then you will give your feed a name. You could call it something simple like "Twitter Posts."

You also need to set the default post status, meaning the moderation style.
You have two options:
- Approved - Tweets from your selected feed destination will automatically be added to your website.
- Needs approval - Tweets will not be added to your website until you login to the social media aggregator and manually approve them individually.
The right selection for you depends on what source you're pulling from. If you're pulling from your own account, you could go for pre-approval. But if you're pulling from mentions of your brand, you'll want to approve them to make sure they are positive.
Even if you are pulling from your own account, you might still want to manually approve tweets in order to select only your best or most important tweets.
Step 3. Select Twitter as the social media source and choose what types of tweets to display
After you've named your feed and set the moderation style, the next step is to choose what types of content to display.
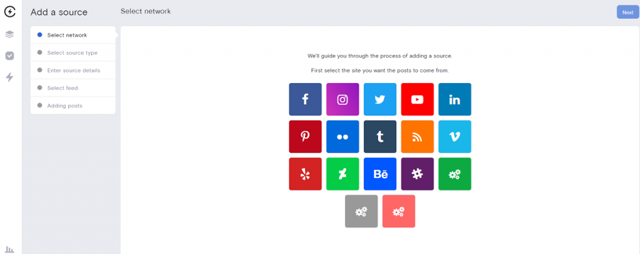
As you can see, Curator offers a lot of options. Go ahead and select Twitter by clicking on the Twitter logo.
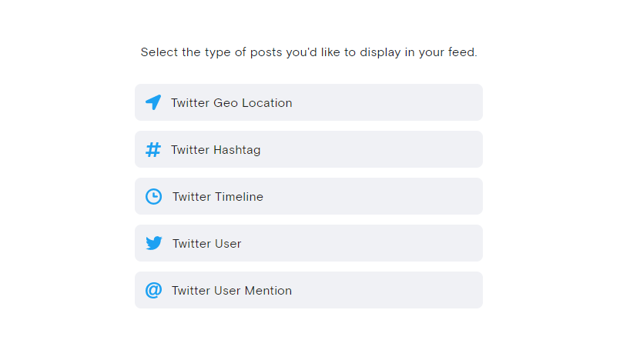
Now, you'll be presented with a list of different types of Twitter sources.
Note that "Twitter User" is the most popular option because it pulls tweets from one specific account.
- Twitter Geo Location - Are you hosting an event? Do you run a coffee shop? Are you in charge of a coworking space? You might want to pull tweets from a geo location to aggregate content about your event or business, instead of just aggregating your own tweets.
- Twitter Hashtag - You can also choose to add tweets to your website that come from a specific hashtag. Maybe you have a branded hashtag for a specific product line, a business conference, or some other offering. Or maybe your non-profit wants to pull together tweets about an important issue.
- Twitter Timeline - A Twitter timeline refers to all of the tweets that you see when you login to Twitter from everyone you're following. You can create a designated Twitter account to follow select users and then pull that timeline into your site.
- Twitter User - If you select a Twitter user, this means that you can aggregate content from your personal or business Twitter account.
- Twitter User Mention - You can use this option to collect and display tweets that mention your Twitter handle. This is great for customer testimonials, book reviews, event reviews, etc.
If you chose a tweet source that pulls content from other Twitter users, make sure that your moderation setting is set to "Needs approval" so you don't end up adding inaccurate or offensive content to your website.
Step 4. Delete any tweets that you don't want showing up in your widget
The Twitter aggregator you choose should make it easy for you to approve and delete tweets as needed.
If your moderation style is set to "Approved" then you will need to delete any tweets that you don't want showing up on your website.
But if your moderation style is set to "Needs approval" then you need to do the opposite. Approve tweets that you want. If you don't approve any tweets, then none will show up on your site.

Step 5. Select a widget template and customize the style
Now for the fun part!
It's time to select a widget template (also known as a layout). You can choose carousel, grid, mosaic, or a dozen other options.
You can keep things simple with a white background and black text, or add borders and colors.
With Curator, you can change the colors of the background, fonts, borders, icons, and more.

Here's an example of a Twitter feed using the Waterfall template and removing the borders:

Go ahead and select some basic customizations for now. You can always go back and update the template and style later.
Step 6. Add the widget to your website
The last step in the installation process is to add the widget to your website.
You can do this by simply hitting "Publish Feed" and then copying the code and pasting it where you want it to go. You can add a custom HTML widget to your homepage, footer, blog sidebar, designated web page, or anywhere else. Then just paste the code into text form.
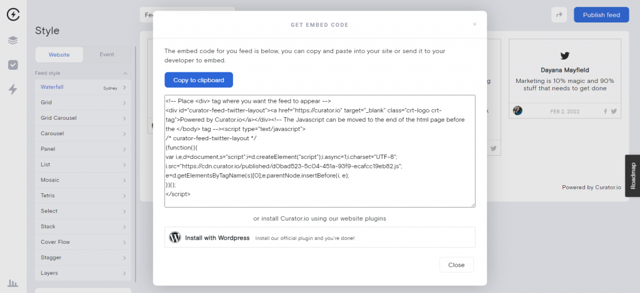
You can also install Curator's WordPress plugin and then you'll only have to copy over some short code.
Step 7. Approve or remove tweets as needed
The installation is done!
This step is simply a reminder to login to your social media aggregator platform from time to time in order to either approve or delete new posts, depending on if your posts are set to be automatically approved or manually approved.
Free Twitter widgets
These free Twitter widgets work for WordPress, Wix, Squarespace, Webflow, and any other website builder that lets you add your own custom HTML:
- Curator
- Twitter Widget by Twitter (note that you can't delete tweets and stop them from showing up)
- Juicer (note that on the free plan, there will be a large Juicer add embedded in your widget)
- Walls.io
- Onstipe
How to add a single tweet
If you want to add just one tweet, you can simply select the three dots above any tweet and then select "Embed Tweet."
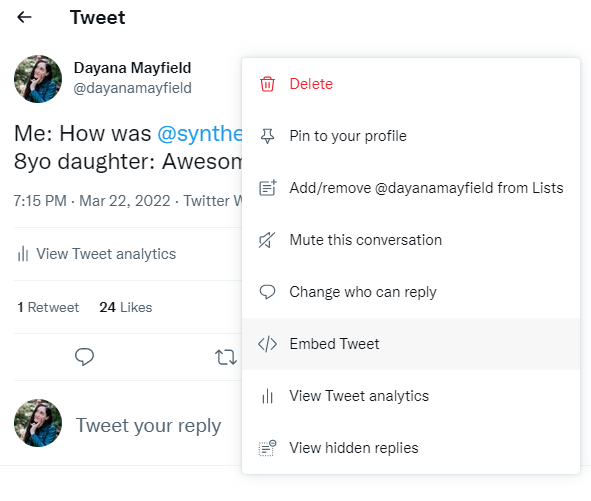
You will then be able to copy the embed code and place it anywhere you'd like on your website.
How to add tweets from an account
To add tweets from a specific account, review our 7-step process above and make sure to choose "Twitter User" as your feed source. You will then be prompted to connect your Twitter account to the aggregator.

How to add a Twitter widget with customer testimonials
If you want to display customer testimonials from Twitter on your website, then make sure that you set the approval setting to "Needs approval." Then you can pull in all of your account mentions into the aggregator and approve the best ones.
You don't need to constantly check and approve new ones. You can login monthly or quarterly to add more testimonials or replace old ones with new ones to freshen up your website.
Here's an example from Synthesis:

How to add tweets from a hashtag
Similarly as with adding testimonials, when you want to add tweets from a specific hashtag, make sure to manually approve them. You can find the top 5-10 tweets and just leave them there on your website, or check continuously to add new ones.
Regardless of the types of tweets you want to add to your site, it's easy when you use a Twitter widget.