Embedding your Twitter feed in your website is a smart way to make the most of your content. When it comes to repurposing content, marketers often give the advice that you should turn your website blog posts into social media posts.
But what about the other way around? Why not put some of your social media content in your website?
The benefits are many, and they include keeping your site fresh and maximizing post reach.
In this article, we detail why you should embed your Twitter posts in your website, different tools you can use to do this for free, and a step-by-step tutorial.
Top reasons to embed your Twitter feed in your website
Before we explore free ways to add your Twitter posts to your website, let's first dive into why you would want to do this.
After all, there are so many other marketing tasks you need to tackle. Why should you prioritize this one? Well, here's why.
Adding your Twitter feed to your website allows you to...
- Make your website visually attractive and engaging
- Show off the type of content that you post on Twitter so that website visitors want to follow you there
- Portray any user-generated content (images and videos taken by your customers and fans) on your website to inspire more people to submit videos or tag you on social media
- Gain more views on news and updates
- Freshen up your website without having to do much extra work
All of these reasons might be important to you, or maybe just a few. As we go through the tutorial, you'll likely get even more ideas and motivation for making an engaging Twitter feed.
Tools for embedding your Twitter feed
Now let's take a look at your options for embedding your Twitter feed in your site.
You can either use Twitter's widgets, or use a social media aggregator.
Twitter embed tools
Twitter's publishing widgets make it super easy to grab code that you can copy and paste anywhere on your website (such as your sidebar or footer).
All you have to do is enter your Twitter profile URL and hit enter. Then you copy the code over to your site. It really is that easy.
Example:

Pros:
- Free
- Fast and easy - takes about 1 minute
Cons:
- Very minimal appearance customization (width and height)
- Might not match the look of your website
- Can't customize the approval process
Social media aggregator
Your other option is to use a social media aggregator. This is a type of software that pulls in your social media posts and lets you easily curate them and display them on your website.
Example:

Pros:
- Some features are free
- Fast and easy - takes about 5 minutes
- Easy to curate automatically or manually
- Lots of appearance customization options to match your site
Cons:
- Some features are paid
- If you have a lot of website traffic, you will likely need to pay for the tool
Because social media aggregators are either free or affordable, it's nearly always worthwhile to use one instead of Twitter's embed features so you can have a feed that matches your website.
Tutorial: how to embed your Twitter feed in your site
Now it's time to go step-by-step into the process of creating an embeddable Twitter feed. If that sounds technical, don't worry. This process only takes about five minutes, including the style customizations that will look beautiful on your website.
Step 1: Name your feed and choose your approval setting
The first step is to create a new feed in the "Organize" menu of Curator.

Give your feed a name that makes sense, such as "Twitter Posts," "Tweets," or "User generated content."
After you name the feed, you need to choose the approval setting.
You have two options here:
- Approved - All posts will be automatically added to your feed and thus, your website. At any time, you can login to Curator and delete the ones that you don't want showing up.
- Needs approval - Posts will not get added to your website feed until you manually login to Curator and approve them.
Most brands can do fine with automatically approving all posts and then later deleting ones they don't want. But if you're really picky about what goes on your website or are concerned about the style or quality of images you post on Twitter, then you might want to set it to "Needs approval" so you have more control over what shows up on your website.
Step 2: Choose the source of your Twitter content
The next step is to choose where you want to get social media posts from.
Of course, for this example, we will go ahead and pick Twitter, but it's nice to know that there are over a dozen other options for you to choose from as well.
You can also source content from Facebook, Instagram, Pinterest, and other popular platforms.
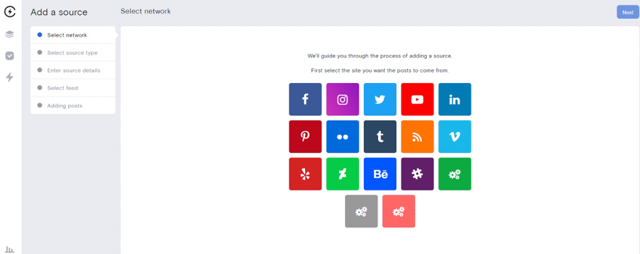
After you choose the network, you'll need to choose the type of source. For Twitter, you can embed posts from the following types of sources:
- Twitter geo location
- Twitter hashtag
- Twitter timeline
- Twitter user
- Twitter user mention

For this example, we'll choose "Twitter timeline." This will pull posts from a Twitter account including standard posts and retweets, but it will not pull mentions or comments.
If you want, you can also combine sources into the same feed. For example, you might want mentions and posts from your timeline. If you ever include mentions or UGC, make sure to require post approval. You don't want to display a negative review of your brand on your website!
Step 3: Delete or approve posts (depending on your approval setting)
Now, you need to either approve posts or delete them.
This is called curating.
If you set your feed to require approval, then you don't need to delete posts if you don't want to, but you do have to approve posts. Otherwise nothing will show up.
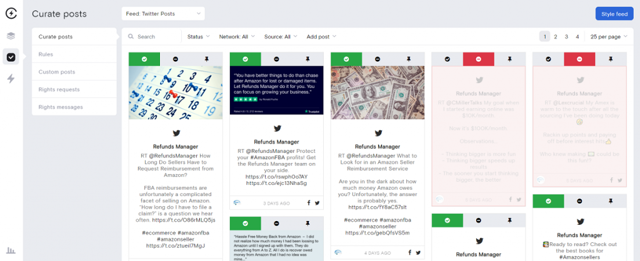
If you set your feed to automatically approve everything, then you need to delete posts you don't want, but you do not need to manually approve any post.
Step 4: Customize the look of your feed
Now for the fun part!
There are lots of options when it comes to the appearance of your feed. Here's what it looks like with the default options:

You can change the layout of your feed. Some popular styles include...
- Waterfall - Cascading list of posts with multiple columns and rows
- Grid - Square images with no captions showing, unless you hover over the image to see the caption
- Carousel - One row of posts with forward and back arrows, also it slowly moves through them automatically
- Panel - One column of post with multiple rows, great for thin-width sections like a side bar
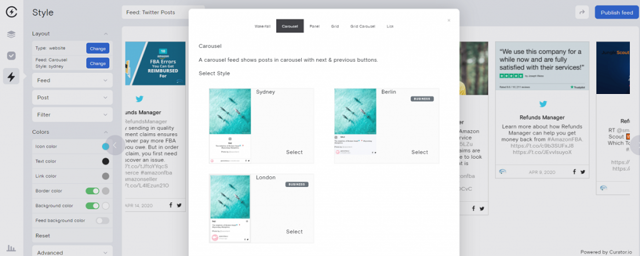
In addition to the layout and template changes, you can also customize colors, borders, backgrounds and more.
Maybe you want to use your logo colors or the colors of the social network, or even the bright accent color that you use across your website.
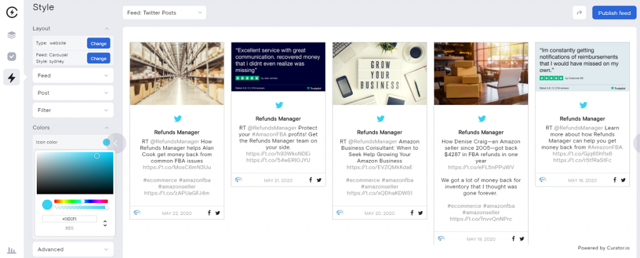
Start with some basic customizations. You can always come back and update the style later after you see how it looks in your website.
Step 5: Copy and paste the HTML code to your site
The final step is simple. Just hit "Publish" and copy the code.

Then you can paste it into your website. Here's what the feed looks like at the bottom of a home page:

You might want to add your feed to your home page, your footer, a dedicated news page, or a blog side bar.
You might even want different feeds for different sections of your website.
If you want to embed your social feed in your WordPress website, then you have the option of using Curator's WordPress plugin. This means you can use short code instead of copying and pasting HTML. Both options are easy to do, so the choice is up to you.
As you can see, embedding a Twitter feed is an easy marketing task with a lot of benefit. Make sure that more of your digital audience sees your great content, not just the people who are logged into Twitter.