You know that awesome Instagram feed you've got going on? Well, imagine if you could sprinkle that Insta-magic all over your website too! We're talking about embedding your Instagram feed on your website like a boss. Why settle for just showcasing your gram-worthy moments on Instagram itself when you can flaunt them on your website too? It's like giving your online presence a turbo boost.
You can invite website visitors to learn more about your brand while keeping your website fresh and interesting.
Get ready to level up your web presence.
If you want to add your Instagram feed in a sidebar, your home page, your footer, or a blog post (like this), then keep on reading!
I've tried tons of methods, from custom coding to copying and pasting each post, and this is by far the simplest method available.
Easy 3-step process for adding your Instagram feed to your site
Embedding your Instagram feed in your website is really easy if you use a social media aggregator.
I've tried other methods and they just aren't as effective.
If you embed one post at a time by copying Instagram's embed code, you have to keep doing that each time you want to add a new post to your website, and it's very hard to stylize your feed.
That's why the vast majority of websites use a social media aggregator.
This is the preferred method, and the good news is it's either free or affordable depending on your needs.
- Sign up for a free social media aggregator - A social media aggregator is an easy-to-use app that pulls in your social media content and gives you the tools you need to organize and stylize that content. Start by choosing a social media aggregator like Curator, which is free or affordable based on your needs.
- Connect your Instagram content - Next, you need to enter your Instagram account name and select the type of content you want to showcase, such as your main posts or only ones that come from a specific hashtag.
- Customize and embed the feed - Choose your favorite template. Then, simply paste the HTML code in the footer of your website, your home page, or wherever you want your Instagram feed to appear.
Now, if you want more details, then keep on reading. We offer tips for customizing the feed to match your branding and tutorials for embedding the feed code in a variety of site builders.
The detailed process for embedding your Instagram feed in your site (7 steps)
Here's a more detailed overview of the process, completely with customization tips.
Step 1: Sign up for a social media aggregator with a free plan
The first step is to sign up for a social media aggregator that offers a free plan.
This is important because...
- If your website budget is low, you can stay on the free plan and keep the "Powered By" link beneath your Instagram feed.
- If you can afford $25 or more, you can remove the "Powered By" link beneath your Instagram feed, but still have a chance to try the platform's features before you sign up for a paid plan.
Step 2. Create a new feed and choose whether or not posts should be automatically approved
Now it's time to create a feed and give it a name.
You can give it a simple name like "Instagram Feed" or "My Instagram Posts" or "Instagram Posts from Branded Hashtag."
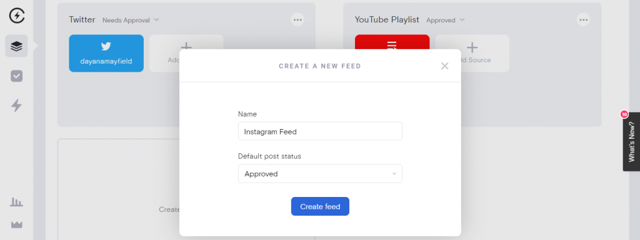
You also need to choose the default post status.
Do you want everything to be automatically approved to show up on your site? Or do you want to have to greenlight each image?
In the settings of your feed, you have two options:
- Approved - All Instagram posts from the source you chose in Step 2 will be added to your site unless you delete them.
- Needs approval - No Instagram posts from the source you chose in Step 2 will show up unless you approve them.
Step 3: Connect your Instagram account and choose the type of posts
When you add an Instagram feed to your website, you have a lot of options for the type of content you want to aggregate.
This is because Instagram has the highest amount of post types of any social media platform.
With Curator, you can aggregate all of these different types of content:
- Hashtag Posts
- Hashtag Reels
- Personal Account Posts
- Business Account Posts
- Business Account Reels
- Business Account Stories
- Mentioned Business
- Tagged Business / Collab Posts
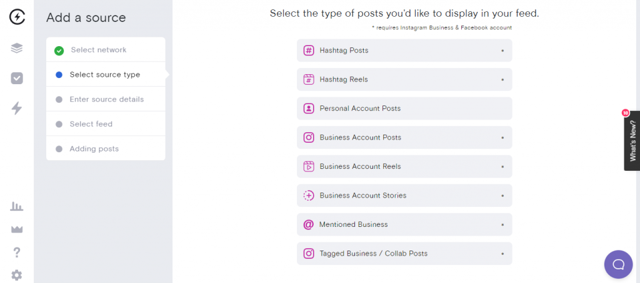
(You can even add social media content from other platforms, but we'll save that for another post!)
You can choose to curate an Instagram feed made up of your Instagram business account, or a few different hashtags.
For this tutorial, we'll go with an Instagram business account. You just sync in via Facebook and select the associated Instagram business account you want to use.
Step 4: Curate your feed (approve and remove posts)
Next up, it's time to curate your feed. You can remove the images that you don't want showing up in the feed you'll embed on your website. You can also update the settings for automatic curation if you want to change them.
If you choose automatic approval, then you need to delete the posts that you don't want to show up. If you choose that approval is required, then you need to approve the posts you do want to show up. If you're set to "Needs approval" and you don't give some posts a green checkmark, then no posts will be able to be added to your website.

Step 5: Design your feed
The next step is to update the design of your feed.
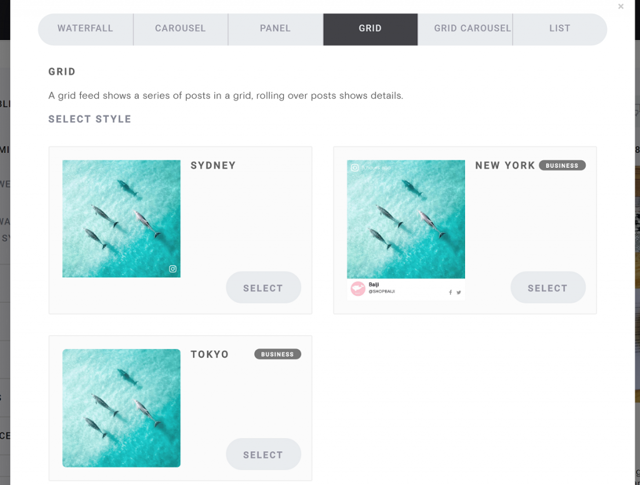
You can choose from our pre-set designs that include different ways of portraying the captions. Some designs let you hover over the image to see the captions, while others put the caption below or next to the image.
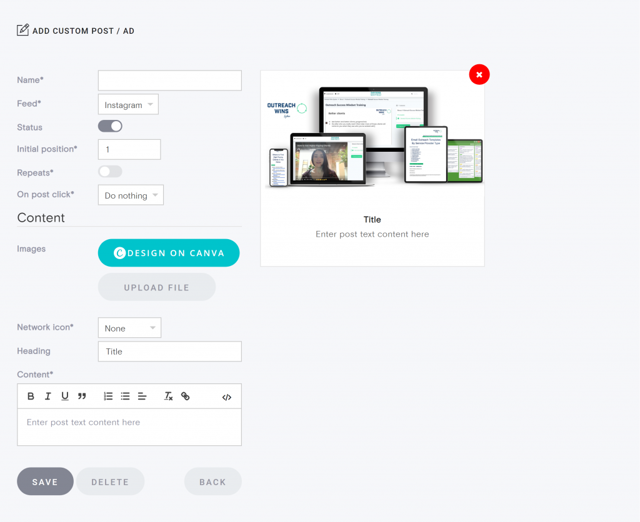
If you want, you can even upload your own custom posts to your feed. Yup, these are images that you didn't upload on Instagram. You might want to do this if you're promoting a product or a freebie offer.
Step 6: Copy the HTML code into your site
Finally, it's time to embed the HTML code into your website. Just hit "Get code" and then "Copy to clipboard."
Then you can paste it wherever you want: a section of your home page, a blog post, a landing page, or even the sidebar of your blog post.

Let's go ahead and add it to the sidebar.
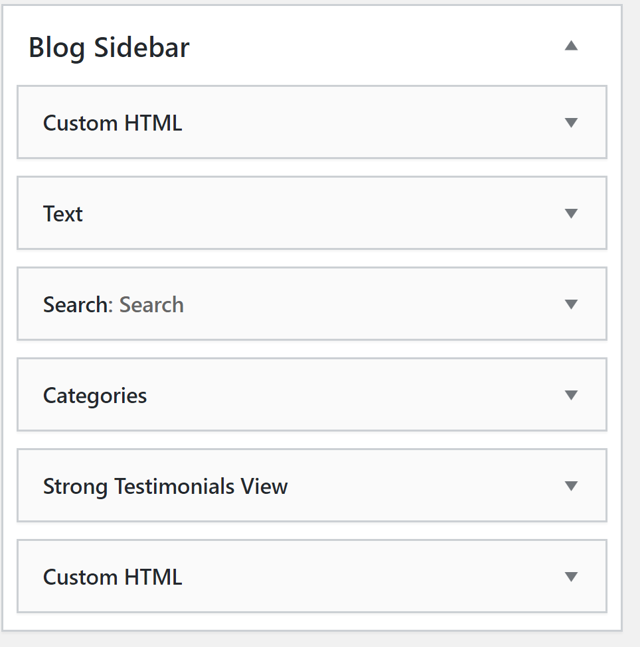
To do embed the Instagram feed HTML code into Wordpress (for free!), we just need to drag and drop a Custom HTML widget over.
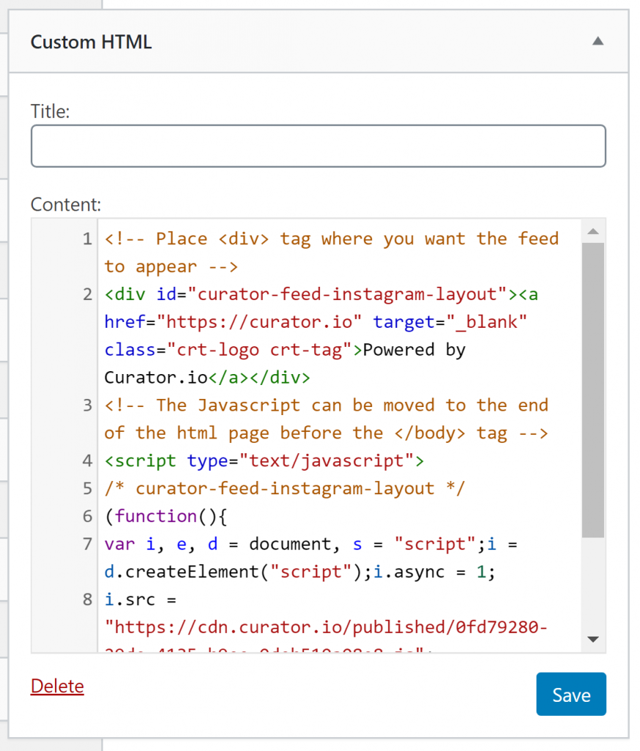
Next we paste the HTML code from Curator.io over to the Custom HTML content box. There's no need to add a title, unless you want to. You could write something like, "The latest Instagram posts" or anything creative you can think of.
Step 7. Check out how the feed looks in your website and make any adjustments
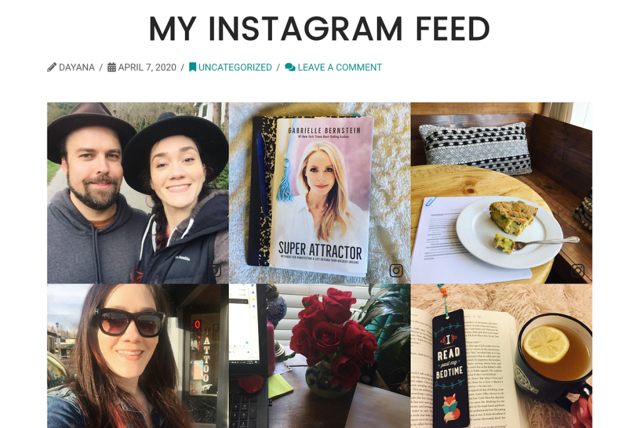
And it's done! Here's what the feed looks like in the sidebar of a blog.

This style puts the caption right below the image and it moves through the posts in an automated slider. It's a very engaging and eye-catching addition to your blog!
But of course, if you prefer a simpler look, you can create a grid style where the captions don't show unless you hover over them, like this example feed:
My favorite styling tips to make your feed match your website
If you want your Instagram feed to really match the branding of your website, you might want to do some quick customizations.
Here are 5 smart ways to update the look and feel of your feed so that it looks great on your site.
1. Change the theme or template
One of the easiest ways to customize your website's Instagram feed is to change the theme or template. Most social media aggregators offer themes that change the look of your feed in a single click.
For example, here's what a feed looks like using Curator's Grid theme.
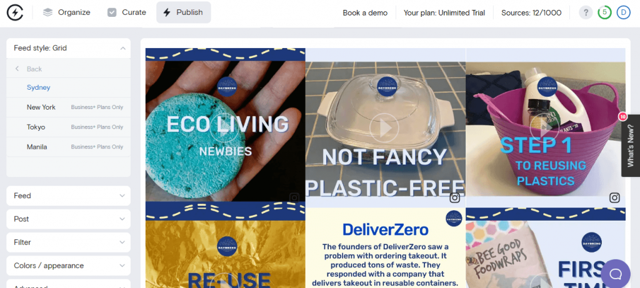
And here's the same Instagram feed using Waterfall (where Reels are not cropped into squares).
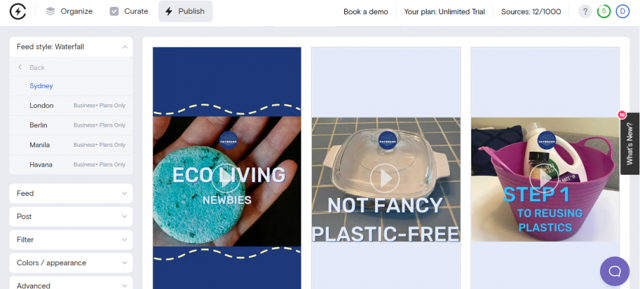
The pre-set theme styles make it easy to change your feed. Click around and try different ones. You'll be able to see a preview that will show you exactly what the feed would look like on your website.
Curator offers several themes:
- Waterfall
- Grid
- Grid Carousel
- Carousel
- Mosaic
- Tetris
- Select
- Stack
- Cover Flow
- Panel
- List
- Stagger
- Layers
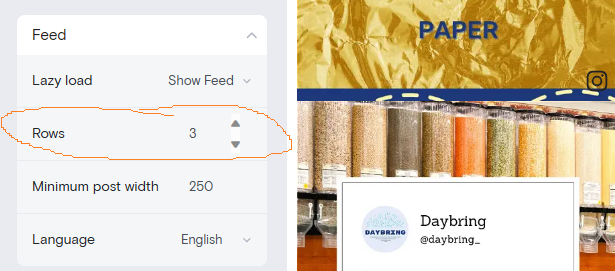
2. Choose the number of rows
Another easy way to update your Instagram feed is to choose the number of rows. Do you want just one row of Instagram content on the footer of your website to show your most recent posts? Or do you want 3, 4, or even 5 rows of posts to show happy customers enjoying your products or your portfolio pieces?
The choice is yours. Head over to the Rows setting of your social media aggregator and choose the correct number. You can always change the setting later if you change your mind and want to add more or fewer rows.
3. Set the post width
You can also try setting the width of your posts. The default is 250. If you want to make it wider, try setting the width to 300 and see how it looks. If you want to make it narrower, go with 200. Again, you can always play around with the width and check the appearance in the social media aggregator's preview. After you add it to your website, you can always change it later.
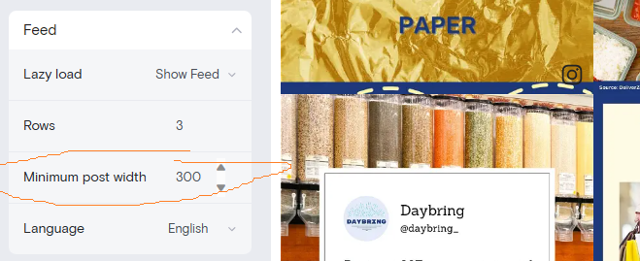
In general, keep this as a rule of thumb: wider posts will be easier to read and create more of a bold, impactful look on your website. A narrower width will allow for more Instagram posts on your website. This can be a good choice if your are curating UGC and want to show a lot of customer photos on your site as a form of social proof.
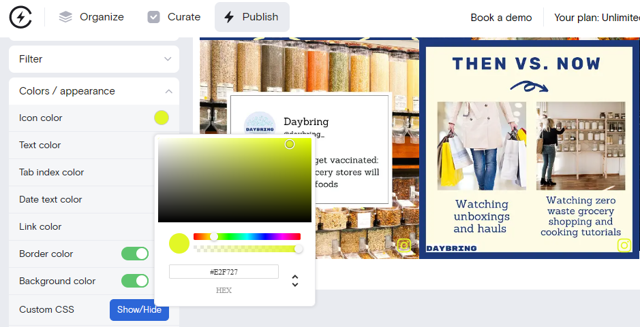
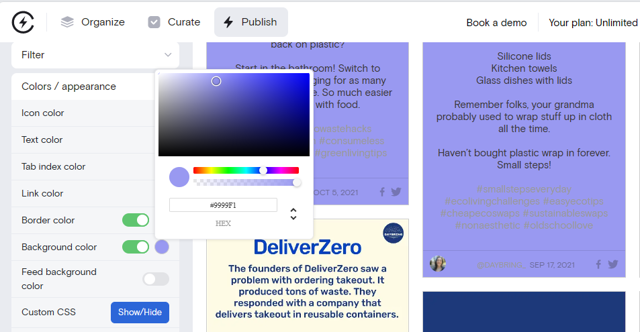
4. Update the text and icon color
You can also try updating the text and icon colors of your content. This allows you to add your brand colors and make sure the Instagram feed really matches your website. Use the HEX code of your website colors.
In this example, we've made the Instagram icon yellow:
5. Add borders or backgrounds
And lastly, try adding borders and/or backgrounds to your Instagram feed posts. Opt for thick borders for a bold look, or try adding a soft tone background that matches your website's design.
In this example, the posts are spaced out slightly, but you can always customize the spacing between posts as well.
Embedding tips for popular website builders
Keep scrolling for tips on embedding an Instagram feed for your specific website builder, including WordPress, Squarespace, Wix, Shopify, Webflow, Drupal, and HubSpot.
WordPress tips
Curator offers excellent WordPress Instagram widget.
When embedding your Instagram content in your WordPress site, the steps are mostly the same as outlined above. The only main difference is that when it comes to actually installing the feed you have two options: 1) copy the HTML code or 2) use Curator's WordPress plugin so that you can copy and paste short code instead.
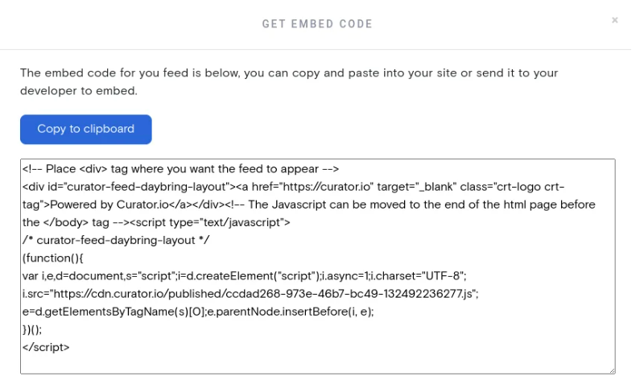
No plugin option:
Just click "Publish Feed" and copy the HTML code into the clipboard. Paste it where you want the feed to go, such as in your footer or sidebar. With WordPress, all you have to do is add a custom HTML widget to your website and then copy the code into the box.
With plugin option:
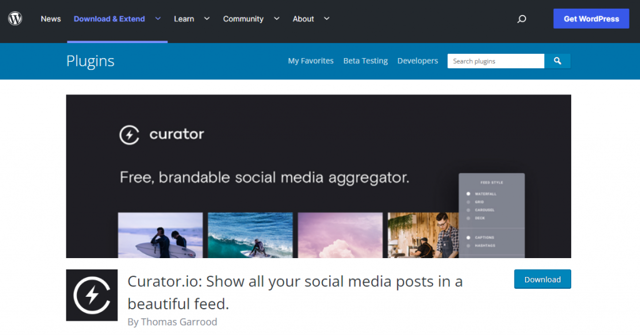
Download the Curator plugin and upload it to your website. Or go to the plugins section of your WordPress website, search Curator, and hit Install. Make sure to activate the plugin.
Then, you can copy short code and paste it where you want it to go instead of having to copy the long HTML code.
SquareSpace tips
To embed an Instagram feed on a SquareSpace website, the only step that is different than what described above is Step 6.
You'll need to add a block to your SquareSpace website for custom HTML code. Then simply paste the feed embed code into that block.
Wix tips
Follow the steps above to use a social media aggregator and generate HTML code.
Then paste the feed's HTML code into your Wix website using these steps:
- Go to the Settings area of your Wix website.
- Go to the Advanced section.
- Click +Custom Code in the top right.
- Paste your Instagram feed code from Curator into the text box.
- Give this code a name, for example, "My Instagram Feed."
- Now select, Add Code to Pages. Click All Pages or choose specific pages.
- Choose where you want the feed to appear: Head; Body - start; Body - end.
- Click Apply.
Shopify tips
To embed your Instagram feed on your Shopify website, follow these instructions:
Shopify is an ecommerce platform, and ecommerce companies typically like to add their Instagram feeds to the footer of their websites.
To add your feed to the footer, use these steps:
- Navigate to Online store > Themes > Actions > Edit Code > Sections > Footer.liquid.
- Add the HTML code into the footer
If you want to create a different feed for each of your products, then simply add each feed's HTML code to the correct product page. This way, customers can see UGC images of that exact product when deciding to purchase it.
Webflow tips
To embed your Instagram feed on your Webflow website, you'll need to follow these steps:
- Go to the Elements panel in the backend of your Webflow website
- Navigate to the Components section
- Select the Embed element
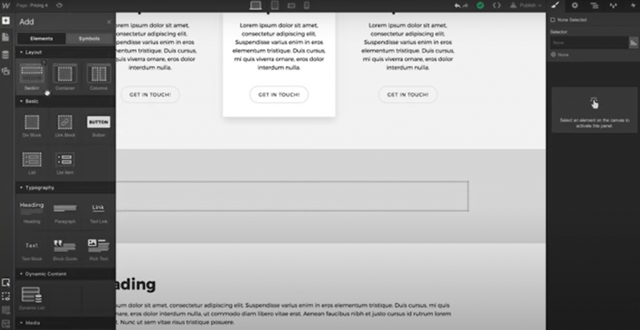
- Drag and drop the Embed element into the right section or container on your website. You only need a container if you want to restrict the width, but most website owners choose to add Instagram posts for the full width of their website.
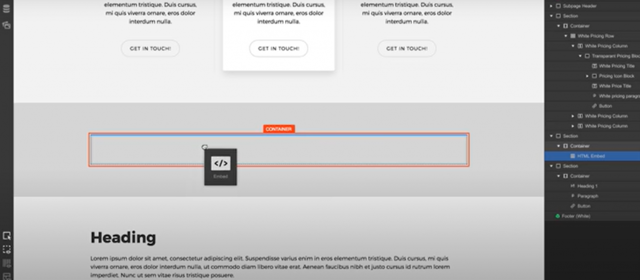
- Hit Publish to set it live.
Then, going forward you won't need to update the code unless you make changes to the style of your feed. Otherwise, you can simply login to Curator to approve disapprove posts, and they will be sent to your website accordingly.
Drupal tips
- Go to your Drupal admin panel
- Navigate to the page you want to embed the feed on and click Edit
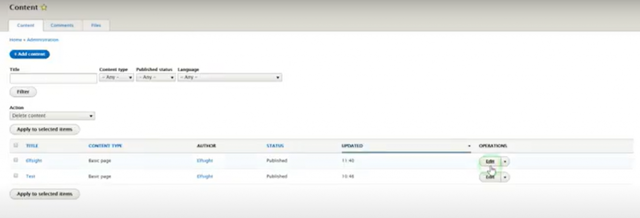
- Select Text Format and then Full HTML to view the page as HTML
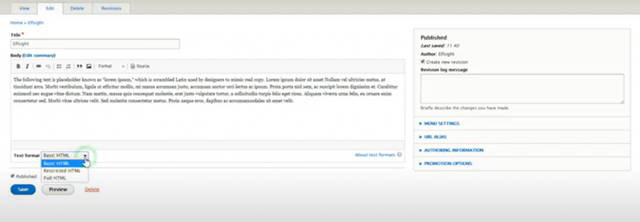
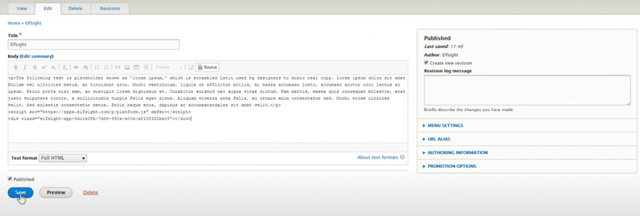
- Place your cursor where you want the Instagram feed to appear on the page and paste the code. If you want the Instagram feed at the bottom of the page, simply paste the HTML code at the end of the source code.
- Hit Save to save the changes and set the feed live.
HubSpot tips
Do you want to embed your feed on a HubSpot website? HubSpot is a CRM that also includes a drag and drop website builder so you get seamless sales and digital marketing tools in one place.
Here's how to embed the HTML feed code with HubSpot.
To add the feed to a specific page:
- Login to HubSpot and select Marketing from the dashboard menu. Then select Website and Website Pages.
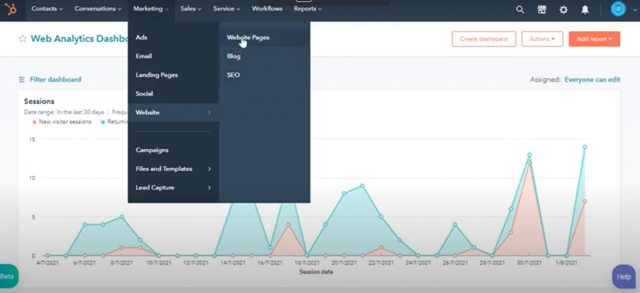
- Make sure the correct domain is showing in the left hand corner. If you have multiple domains, select the right one.
- Navigate to the name of the page where you want the feed to appear and select Edit.
- In the content editor, select the Settings tab.
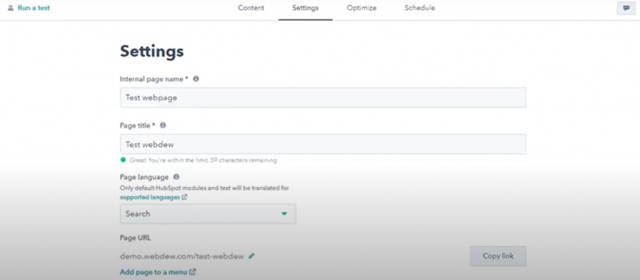
- In the Settings section, scroll down to Advanced options. Then scroll to Additional code snippets.
- Paste the code where you want it to go, such as the page footer.
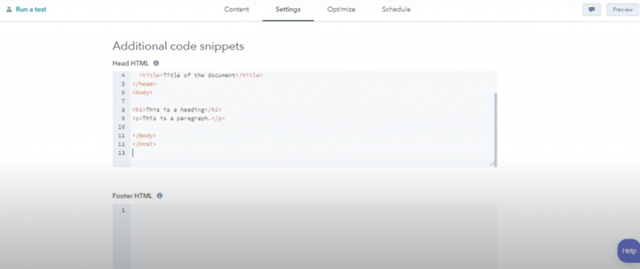
- Click Publish to update the page.
To add the feed to your entire HubSpot website's footer, follow these steps:
- Navigate to Marketing > Website > Pages.
- In the upper left, select the correct domain.
- Click Override default settings in the Site Footer HTML section.
- Enter your code snippets in the Site Footer HTML section.
- In the bottom left, click Save to apply your changes.
Frequently asked questions about embedding Instagram posts
Read our answers to frequently asking questions about embedding your Instagram feed in your website.
Most website owners and developers want to add their own Instagram feed to their website. But what if you want to add posts from other Instagram users? To do this, simply choose Instagram Hashtags when selecting the type of content. This will pull in all posts tagged with that hashtag. Make sure to use manual approval and approve everything individually so you don't get the wrong types of images showing up on your website!
Instagram offers a lot of different types of posts. It's important to take a step back and think about what you want to aggregate. Do you just want to embed your Instagram feed? Or do you want to embed photos and videos that other users post about your business?
You can embed all of these types of content:
Hashtag Posts - Embed feed posts from a specific hashtag, such as your wedding's hashtag or the hashtag you use for user-generated content.
Hashtag Reels - Embed Reels that are tagged with a specific hashtag. This is great for brand challenges, especially dance ones.
Personal Account Posts - Embed all of your Instagram feed posts from a personal account.
Business Account Posts - Embed all of your Instagram feed posts from a business account.
Business Account Reels - Embed all of your Instagram Reels from a business account.
Business Account Stories - Embed all of your Instagram Stories from a business account.
Mentioned Business - Embed feed posts from whenever your business account is mentioned in a caption.
Tagged Business / Collab Posts - Embed feed posts from whenever your business account is tagged. This is a popular option for featuring content from your paid influencer campaigns on your website.
You'll want to continue checking your website to make sure that only the best content is showing up.
Moderate your website based on your approval setting. If you chose automated approval, then be sure to delete posts you don't want. If you chose manual approval, you'll need to regularly login to approval the posts you want on your site.
Curator.io is an easy-to-customize aggregator that lets you pull from over a dozen sources. If you'd like to give Curator.io's free forever plan a spin, sign up today.